Saturday, November 8, 2014

doTERRA christmas ideas.

Hi all.

I've had several folks tell me they have family interested in oils and they'd like to get some gifts for them for christmas, or they themselves are interested in oils but do NOT know where to start as far as what to ask people to get them!  So, i'll make it easy for you!

First off, here is my link where you can go to shop

www.mydoterra.com/laurenrburkey


doTERRA DOES have a holiday catalog, which i'll link later in this post, BUT, i wanted to offer some good practical ideas to you as well!

Here are a couple of quick gift recommendations & ideas:


1.) an all around very very BASIC starter kit:

$26.67

this kit includes a 5ml bottle of lemon, lavender, & peppermint along with an informational dvd.


2.) a Much more in depth starter kit that INCLUDES A FREE WHOLESALE MEMBERSHIP!  "family physician kit"

$150.00


this kit includes the top TEN oils used for common every day ailments that you come across, includes an informational dvd AND a wholesale YEAR membership which means you get wholesale prices on oils opposed to retail prices!  This is a KILLER deal because it includes oils that by themselves are VERY expensive.    This would be an AMAZING gift for someone really wanting to dive into essential oils. 


3.)  Two Oils That are great for Stress & Relaxation.

$66.67


AND, doTerra is offering a christmas catalog as well with some cool items in it, take a look here:


have a great weekend!!!


Tuesday, October 14, 2014

Cold & Flu Season With Essential Oils. (WHERE DO I EVEN START?!)

Let's Be Honest.

Essential Oils Can be Confusing, Overwhelming, & Expensive!   I know so many people who have used doTERRA oils with very positive results, but they don't know where to begin!!  Sure, if you have unlimited funds, it's no problemo- just buy them all!


 BUT, i'm going to give you a PRACTICAL suggestion on a few oils to have to start up and to stay under a $100.00 Budget :)  These are the oils i'd suggest for having during cold & flu season.

First and foremost:

OnGuard:
retail price: $42.67


this is a MUST for cold and flu season.  This is an oil blend, some of the oils in this blend are Clove Oil, cinnamon bark, wild orange.  Clove oil BLOWS it out of the water on the ORAC scale (a scale that measures antioxidants)  This stuff can support a healthy immune system and is proven in labs to kill MRSA and H1N1. WORTH EVERY PENNY!  (you can make hand sanitizer spray out of this too! and clean your home with it!)


2. Breathe
retail price:
$26.66

this is another blend of oils.  Helps to open up airways and can help immensely with cough, and congestion.  So handy to have on hand.  I diffuse this in my kids room by them at night if they are struggling with cold symptoms


3. intro kit
(includes 5ml of LEMON, LAVENDER, & PEPPERMINT)
Retail Price:
$26.67

These 3 oils (lemon lavender & peppermint) are probably some of the MOST USED oils.  Because they have SO MANY good uses.  Lemon has detoxing properties.  Peppermint and Lavender can ease symptoms of fever and headache.  Peppermint can clear airways like you wouldn't believe, and Lavender is one of natures STRONGEST antihistamines.  


So, without giving you so much information that I overwhelm you, that's what I suggest you start with with a budget of $100.00

total retail cost of the above products:
$96.00


Now, my TOP recommendation if you do not need to stay under 100, is to buy the "Family Physician Kit"  This kit will cost you $150.00.  BUT, it INCLUDES a one year doTERRA membership.  Which means you will get WHOLESALE prices on all doterra products for a year, and you can also earn FREE products monthly, and earn points on your monthly purchases to cash in for FREE product!  It also comes with a DVD to learn much much more.


this kit has the TOP TEN oils used for common ailments.  AND, it includes a free 15ml bottle of "Slim & Sassy" which is a blend good for cravings and metabolism! 

This is the best way to go to get the most for your money  BUT, if you can't do $150 now, the above more budget savvy option would also be a fantastic start!!!

to order go to www.mydoterra.com/laurenrburkey


for questions- contact me ANYTIME on fb or at lroseburkey@gmail.com


Have a fantastic rest of your week!


*this statement has NOT been evaluated by the FDA.  This product is not intended to treat, diagnose, or cure diseases. 


Wednesday, July 16, 2014

My Stinky Pits. A little TMI to start your day

so. i sweat.

a LOT.

It's ridiculous.  I've gone through what I feel like is every brand of deodorant out there.  I've made my own,   I've also seen specialist and they've prescribed me different types.  The prescription works for me...BUT, i know that it's FULL of chemicals, and STRONG ones.

So, i know that it's not bad for someone to sweat, it's a natural process. BUT, what's embarrassing is when that sweat STINKS!!  It's awful to have to go through several shirts a day b/c you feel like you're extra stinky!!

So, let me introduce you to my little friend:


I had seen that a few drops of this diluted with some coconut oil under your pits was supposed to work wonders.  I LOVE my oils, but after MANY MANY fails with my "stink" i wasn't hopeful.

Well, one week later and i'm THRILLED with how this is working!!! Am i still sweating? Yes!! NOT AS MUCH and when I do sweat, IT DOESN'T STINK!!!!  

I'm so happy to have found something all natural that helps!!  

This oil is pretty inexpensive too! ($24!)

It's not just for stinky pits either.  It's GREAT for bug bites, for cleaning any "stinky" thing (dishwasher, moldy laundary machine,etc)  It's great for cuts and wounds and it disinfects!  I like to diffuse it when someone in my house has been sick.

and feel free to email me questions!

Monday, June 9, 2014

How do I attempt to keep my family from getting sick (Part 2)

Okay folks,  It's been quite a while.  But, i'm super excited to share with you what i'm about to share.  A huge part of what has been a life changer for my family and our health, is:


essential oils


My family has been using essential oils for a year now.  Our health has totally transformed.  In the past year we have gone to the doctor a total of two times.  One for Owen's ear infection, and one for the shoulder problems I've been having (that's a neat story too- will share later!)  Before using oils, we visited the doctor once a month, no joke.  A ear infection would pop up, or some random virus, all the time.  Sometimes we would go a little longer then that, but especially during flu season we could be there monthly.   
At first, when I learned about doTERRA essential oils i thought, "what's the catch?"  but as I have researched and learned more and more, and used them more and more, I realize that it just makes sense!!!   God designed our bodies to heal themselves, with the right input of the right things!   Back in the bible days, how do you think people helped themselves when they were sick?? They used what God gave them!!! Plants, the earth,  you name it! 

What is an essential oil??
Essential oils are natural aromatic compounds found in the seeds, bark, stems, roots, flowers, and other parts of plants. They can be both beautifully and powerfully fragrant. If you have ever enjoyed the gift of a rose, a walk by a field of lavender, or the smell of fresh cut mint, you have experienced the aromatic qualities of essential oils. In addition to giving plants their distinctive smells, essential oils provide plants with protection against predators and disease and play a role in plant pollination. 
Essential oils are non water-based phytochemicals made up of volatile aromatic compounds. Although they are fat soluble, they do not include fatty lipids or acids found in vegetable and animal oils. Essential oils are very clean, almost crisp, to the touch and are immediately absorbed by the skin. Pure, unadulterated essential oils are translucent and range in color from crystal clear to deep blue.


                                                            How do you use them?
The better question for my family at least, is how DON'T i use them ?? ;)  It's so fun to learn about how each individual plant has qualities that can help us.  At first i was using them for headaches, scrapes on the kids, ear aches, cold sores, inflammation, bruises, etc!  And cleaning- i love using them to clean.   I've recently been using them for my seasonal allergies.  That's right- i've YET to had to take an allegra or allergy pill this year because I just use oils!!! And my most RECENT success with oils has been with my shoulder.  Some of you know, i've been having INTENSE shoulder pain.  I went to the doctor only to have her tell me i have "partially frozen shoulder" and prescribe me a LARGE amount of anti-inflammatory and muscle relaxer.   I know that there are oils that have anti-inflammatory properties, so i went home and did my research!!!  Fast forward to almost 3 weeks later, and i have almost NO pain in my shoulder.  It's so so much better.  It's not totally gone yet, but it is NIGHT AND DAY difference!!!!!   I'm so excited about that!!! I didn't even fill my prescriptions the doctor gave me.  So, what did I do?? I used a combination of frankincense and Thyme oil.  (if you want to learn about frankincense oil and why i might choose that oil, check this out: http://www.everythingessential.me/Oils/Frankincense.html  and thyme; http://www.everythingessential.me/Oils/Thyme.htm)and I used one of doTERRA's blends called "deep blue" for pain & inflammation.  ( http://www.everythingessential.me/Blends/DeepBlue.html )I applied these twice and day, AND- i've been faithfully taking doTERRA's Lifelong Vitality Vitamins.  I would recommend ANYONE with chronic pain or fatigue, or  just anyone who wants to live a healthier life, to try these out!!!!!  There is a 100% money back guarantee if you try them and aren't satisfied.   I was on them for a while about a year ago- then went off of them because I thought they were too expensive & i was trying to pinch pennies.  Well, I'm right back on them and pinching pennies ELSEWHERE, bc these are just so good for me!!! I definitely attribute my lessening of shoulder pain to those as well!   I've noticed that people will pour money into going out to eat, vacations, new clothes, you name it! But, when it comes to ourselves and our health, we become more tightfisted.   Which is why i went back on those vitamins... I've realized that my health is one of the most IMPORTANT things I can do for myself!!!


I truly believe in using natural things to help our bodies heal themselves!!  These products have been so awesome for my family, that I signed up to be a rep.  So, if you have any questions- please email me (lroseburkey@gmail.com) or fb me or whatever!!! I love to discuss them with people and my hope is that I can help other people feel empowered in taking care of their family and health, naturally! :) I'd love to hear some of your health needs and maybe recommend what might be beneficial to you!!!  You can check out products and prices at www.mydoterra.com/laurenrburkey 


ps- if you have used doTERRA oils and have an awesome testimonial to share on this post, in the comments, PLEASE DO! :) 

Monday, April 7, 2014

How do I attempt to keep my family from getting sick ? (Part 1.)


Nobody ever wants to get sick! We all know that.  I have really taken some health measures to keep sickness out of my house.  In fact, we have not had to visit the doctor (besides kids well-checks) since June 2013, when i start implementing some new things into our life that i'll be sharing with you.  We've been so blessed to skip any type of flu this flu season, and have just experienced the occasional sniffle, even though there have been times we have been exposed to people with the flu or other viruses/illnesses. (LOTS of times, actually)

I'll share these things in parts since we do several things at our home. 

A little disclaimer:
i do NOT think my family is invincible of sickness.  that would be totally ignorant.  AND, i realize that there are families who have tried to prevent sickness and have still struggled much of this past winter with sickness.  That happens, and i'm in no way putting those folks down or claiming that didn't do the "right things."  Maybe the things i'll share with you won't even be right for you!  BUT, they are right for my family and I definitely want to share with you all :)

Take it or leave it, no problem either way! 


sooooo.....


Who knows what these little pretty berries are?


elderberries. 

Elderberries have been used for thousands of years in places like north america, western Asia, Europe, and North Africa.   It has been called "a Holy Tree" due to it's what they would call in the middle ages "healing power."   
Now i probably wouldn't myself called it a holy tree, but- there are some definite health benefits that this little berry offers!

They are VERY rich in antioxidants, more then twice the amount of blueberries!

from an article on Dr. Mercola's website:
"Antiviral components of elderberry fruit extract were tested and found to effectively inhibit Human Influenza A (H1N1 virus) in vitro, possibly by blocking the ability of the virus to infect host cells. The extract was so effective, that researchers compared it with the prescription medications Amantadine and Oseltamivir (Tamiflu)."

You can use elderberries as a flu-preventative, (or cold), OR, as a treatment when you get sick.  We make it into a syrup that we take DAILY! :)

this is a picture of me simmering my elderberries! 


To make it into a syrup is quite easy, and because it is SO SO sweet, my kids will drink a spoonful of it daily without any fuss!   I also add their liquid fish oil to it and they take it down without even batting an eye!!

It takes about an hour to make, but is very hands off!  

here's what you need:

- 2/3 cup elderberries
-3.5 cups water
-1 cup LOCAL RAW honey
-ginger root (1 tsp-optional) 
-clove (1/2 tsp-optional)


Bring the 3.5 cups water and elderberries to a boil, add spices, then cover and simmer for about 45 minutes until the water has boiled down a bit, and the elderberries seem quite soft.  
Take off burner, and let cool.

Drain the juice off the berries (KEEP THE JUICE!! ditch the berries)  
After the juice is totally cooled, add the 1 cup of raw honey, and store in the fridge!! :)

I keep mine in a cute little glass bottle :)  It stays in the fridge for up to a year! Although my batch usually only lasts 2 months.


Questions?!
let me know!!


Cheers to healthy lives!

Friday, January 24, 2014

My Friend, the POM.


I've decided to start to do some posts on individual food, as well as recipes.  My heart lies in health, and teaching about it.  I'm not perfect.  Not even close.  But i am learning and am continuing to learn more then I ever have before, and I'd LOVE to share some of that info with you all.  (all 5 of you? ha)

The Pomegranate is supposed to be the most POWERFUL of all antioxidants in fruits.
It supports your immune system.
Is Shown to lower blood pressure.
Cancer-fighting agents.

and those are just to name a few!!!
(by the way...feel free to research it yourself too!! I don't know everything, and I won't pretend that I do!!! PLUS, i'd LOVE for any of my readers to learn more on their own!!!)

A big reason people don't buy these beauties are because it's "TOO HARD"

well, you can look up all kinds of "how to eat a pomegranate" online, but it's true, a lot of it does led you back to complicated procedures.  :)

Here's an effective way i've found to eat my pom's!  EASILY.

have a large bowl of cold water ready!
get a cutting board and cut the thing in half, and put in the water.
put another bowl nearby (to put the fruit in)
(i'd recommended doing this in the sink)


at this point, take your hands and just fish those seeds out!! Having it in water keeps in SO MUCH CLEANER!

Then you can strain seeds in colander and put in a bowl, or fish them out with your hands!

ENJOY!

A remember there is some truth to the saying "you are what you eat!"


Thursday, January 9, 2014

Yet again another new way of eating.

So, My husband and I have decided to spend 60 days eating "paleo."

This is also known as "the cave man diet"

It's just another way we want to experient with our diets :)

basically, it is NO:

grains
legumes
refined sugars
starchy veggies
dairy.


Let me tell you guys....it is HARD.  I want cheese.   We are on day 9 and some of my cravings for dairy have NOT subsided.  But, I'm glad i'm doing it!
I like switching things up, and trying to become as healthy as I can.

If you know me, you know i Love spaghetti.  Paleo is pretty hard to eat spaghetti on.

So, i made these "noodles"


That, is a bunch of "noodles" made from zucchini.  Tossed in some olive oil and lemon juice.  

and they were 
DIVINE.

I made my own "sauce" (which consisted of tomatoes and lean beef) to go on top.  
My whole family GOBBLED this right up.


here is what I did.

Took 4 large zucchini's and used a julienne peeler to make the "noodles"

I tossed them in a bit of olive oil, lemon juice, salt, pepper and oregano. 

you can eat them just like that if preferred.

But, I tossed them in a pan to make them nice and hot!

I then cooked up onions with lean beef, used a can of crushed tomatoes, spices of my preference, and called it the "sauce."

how easy is that?!


eat.up!

Wednesday, December 4, 2013

Holidays (Raw pumpkin pie)

Oh the holidays. Generally a "dieters" demise.  BUT, for me, I want to make healthy eating an every day lifestyle, not a strict "diet."
So, for thanksgiving I made a raw pumpkin pie. And holy cow.


It was so amazingly tasty! Dare I say I preferred it over all the other pies?!!!  Because I did!

And it was so so easy too! The nice thing about raw desserts is they generally require no baking.

So here's the recipe!

Filling Ingredients:
  • 3/4 Cup Pumpkin Puree
  • 1/2 Cup Cashew Butter
  • 1 Tsp Vanilla Extract
  • 1 Tsp Cinnamon
  • 1/4 Tsp Ginger
  • 1/8 Tsp Cloves
  • 3 Packets Stevia
  • 2 Tbsp Agave (Honey, Maple Syrup or Stevia to make this no-sugar)
  • Dash of Salt
Crust Ingredients:
  • 1 Cup Shredded Coconut
  • 1 1/4 Cup Pecans + Extra for Topping
  • 1 Cup Pitted Dates
  • 1 Tsp Vanilla Extract
Directions:
  1. Using your small food processor bowl and blade blend all pie filling ingredients until smooth and set aside.
  2. Using your large food processor bowl and blade process all crust ingredients until dough like consistency with visible chunks of nut (setting aside extra pecans for topping).
  3. Grease an 8×8 baking pan or glass dish with a healthy oil.
  4. Press crust mixture evenly into baking dish.
  5. Top with pie filling using a spoon or spatula to make sure the filling is evenly distributed over the crust.
  6. Add extra pecans over the top. 
  7. Cover with saran wrap and freeze overnight.
  8. When you’re ready to serve remove from the freezer, cut into squares and serve immediately.


If you try it- let me know how you like it!!! it's delicious!!!!!


Thursday, November 7, 2013

Peanut Butter Cookies.


Let me confess.  I have a small giant sweet tooth.  I love sweets.  So, in my journey to become a happier healthier me, i've learned to make some tasty treats that don't lots of yuck in them.

Because holy cow- have you read all the stuff out there lately about sugar?
Here are a few articles to skim if you haven't heard anything bad about this tricky like substance yet:


(i encourage you to do your own research as well- please!)


Anyways, these cookies are so yum.  And let me say, EASY PEASY!!!!!

Check out these ingredients:

1 cup natural peanut butter (make sure the only ingredient is "peanuts")
8 oz (1 pk) cream cheese.  (make sure to buy the 1/3 fat kind.)
1 tsp vanilla
1/4 tsp sea salt
1/2 tsp baking soda
1 egg


Mix it all together. Bake at 350 for about 12-13 minutes and leave about 2" apart.  

That's it.
kind of a weird shot...but they are so yummy and moist! Not dry at all.


of course they have some fat in them, but SUCH a good choice if you need something sweet (like i often do)  You'll feel so much better having a few of these then if you go through the drive through at the DQ!  (which let me say...that's pretty delicious too. Just not as delicious on the waist linnnnne)

Saturday, November 2, 2013

Yet another Soup. Sweet Potato Black Bean.


There are few things that make me feel better then feeding my kids all these colors.


This soup is hearty, delicious, and healthy! And is totally customizable!  Add or subtract spice based on your likes.

It's simple and easy!

Here's what you'll need to do:


1 T olive oil
1 red onion, chopped
3 cloves garlic, minced
1 large sweet potato, peeled and chopped
1 roasted red pepper, chopped (you can use jarred)
2 cans low sodium vegetable broth (15 oz. size)
2 cups water
3 cans low sodium black beans, rinsed and drained
3 cans diced tomatoes with green chiles
1 T chili powder
2 teaspoons cumin
Dash of red pepper flakes
1/2 bunch of cilantro, chopped
Salt and pepper, to taste


1. In a large soup pot, heat the olive oil. Add in the onion and cook until tender. Add in the garlic and cook for about 2 minutes.
2. Stir in the sweet potato and roasted red pepper. Cook for 5 minutes.
3. Add in the broth, water, black beans, and tomatoes. Stir well.
4. Add the chili powder, cumin, and red pepper flakes. Stir and toss in the cilantro. Stir again. Let the soup simmer on medium low for 30 minutes, or until the sweet potatoes are soft.
5. Season with salt and pepper and serve hot.
**You can garnish the soup with cilantro, avocado slices, cheese, tortilla strips, and/or sour cream. To freeze-cool completely and put the soup in freezer safe containers. **


Enjoy.

Sunday, October 13, 2013

Sausage Kale Butternut Squash Stew!

This was such a yummy and hearty fall meal for tonight!


I paired it with some homemade gf cheese biscuts! 


For the soup, here's what you need:

-Chicken Sausage- 3 links ( i used the kind with no nitrates or preservites that were already precooked)
-1 large bunch of kale
-1 medium onion
-1 red pepper
-1 can of cannelini beans (white kidney beans. you could use garbanzo or really whatever you wanted)
-8 cups chicken broth
- 2 garlic cloves
-3 cups butternut squash (about 1 small squash)
-salt and pepper to taste
-parm cheese for topping if so desired.


Here's what you do!

1.  Peel and chop the butternut squash, dice into cubes and cook for a while however you prefer  (you can do it in the microwave, the oven, or even the stove top! Cook until a little bit soft)
2. Meanwhile, put some olive oil in the bottom of your LARGE soup pan.  Could use veggie oil or cocout oil too.  Add minced garlic and let cook about a minute.  then add onions and peppers and cook for another 4ish minutes
3. Add all other ingredients, and let come to a boil so veggies are fully soft and heated through out!  After veggies are all cooked, let simmer a couple minutes!!

Easy peasy.

Here is the recipe for the biscuits. Which i thought paired excellently with this soup.

Here's what you need:
- 2 cups grated cheese (use whatever you have on hand.  I think cheddar and mozza were awesome)
-1.5 cups rice flour
-2 tsp baking powder
-1 tsp salt
-2 TBspns. honey or agave nectar
-1 egg
-1 cup of milk (i used 2%)


Here's whatcha do:
1. preheat oven to 410 degrees
2. Beat the egg and milk together
3. Mix all dry ingredients together. (this includes the cheese)
4.  Add dry ingredients to the wet ones, and don't over mix.
5. Bake for about 12 ish minutes.  You can add things to them if you want! Onions, bacon, etc.


ENJOY! and happy fall.


Tuesday, September 24, 2013

Eggplant Roll ups (lasagna roll ups minus the noodles)

Guys.  Don't skip this recipe because you don't like eggplant.  Because we aren't eggplant fans either.  Except...we GOBBLE this up.

It is SO good.

I give you, egg-plant roll ups


It's super simple, it just takes some time to chop those veggies!!  Because i LOAD them on


So, here is what you need (this will feed a family of 4)

-2 LARGE eggplants (if your eggplants are small, get 3)
-Pasta Sauce.  Make your own, or buy a jar with no yucky ingredients :)
-Mozzarella Cheese
-Veggies!!!  You can use whatever you have on hand, i used
*carrots
*zucchini
*onion
*red pepper


Here's what you'll need to do!

1. Preheat oven to 350
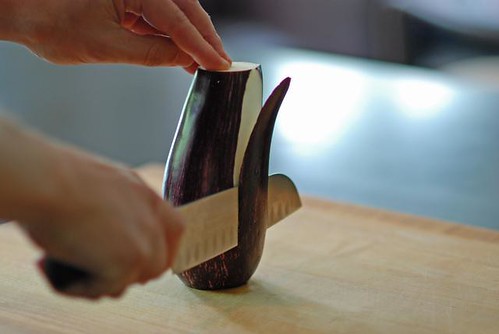
2. Slice eggplant into long, thin slices, like this
it should look like this
lay them on a cookie sheet, shake salt and pepper on them, and cook for about 10-15 minutes until they are flexible.
3. While your eggplant slices are baking, chop up all your veggies, put in a pan with olive oil, minced garlic, and all the seasonings of your choice.  Cook up until slightly soft!
4. Combine half the sauce, and half the cheese in a bowl together.
5. Once your veggies and eggplant are all ready, put a spoonful of the sauce/cheese mixture on the end of one slice of egg plant, and then a spoonful of the veggies, and ROLL IT UP, and place in a baking dish.
Repeat this with all of your eggplant
6.  After they are all in the baking dish, use the rest of the sauce you have and cover them, and then sprinkle with the remainder of the cheese and bake for about 12 minutes

:)

then..

EAT.


my kids devour these too.
Nothing makes this mama happy like watching her babes consume mass amounts of veggies.


Tuesday, September 17, 2013

LOADED gluten and sugar free mac and cheese.

My kids gobble this.  GOBBLE it.  (and my husband does too)


I will say, it has a LOT of cheese in it.  So, this meal is higher in fat for sure.
BUT, it's a GREAT alternative to other mac and cheese meals, and the loads of veggies snuck in are AWESOME.


Here's whatcha need:
1 bag of brown rice elbow noodles
(could also use corn noodles)
Broccoli (about 1 cup)
red pepper (about 1/2 cup)
onion (small)
carrots (about 1/2 cup)
1 bag of sargento sharp cheddar cheese (this brand works BEST)

*you can definitely change up these veggies if you'd prefer different ones! I tend to add zucchini and yellow squash and sometimes spinach and mushrooms to mine ! the possibilities are ENDLESS.
:)

Here's what you do!
1. Pre-heat oven to 400
2. Boil your noodles.
3. While your noodles are boiling, chop all your veggies into small pieces, put on a cookie sheet, drizzle with olive oil salt and pepper, mix with hands, and bake for about 20 minutes or until veggies are soft!
4. Once noodles and veggies are done, mix together in a casserole dish and set aside while you make your cheese sauce! 
5. For the sauce:
- put about 4 tablespoons oil in a pan, and heat up 1-2 cloves of garlic in it! 
- Then add 3 TBspns of coconut flour (could prob sub brown rice or any gf flour) stir really well. 
- Once well incorporated, add 1&1/2 cups milk. Stir until mixture is really hot.
-Dump in the entire bag of cheese, take off the heat, and mix constantly until cheese is melted.
6. dump the cheese sauce over the noodles and veggies, stir really well.
7. This step is optional.  I like to add some cheese on top, and stick in the oven for about 10-15 minutes.   you could skip the add cheese part, and just heat it up in oven until hot and serve!

Easy, yummy and a hit with everyone 

:)


*you can add spices of your liking
I've used red pepper flakes for a little more spice before, i've also used some oregano! The great thing about this recipe is you can sub things in and out to your liking!! :)

if you have questions, don't hesitate to ask!

another SUPER simple side.

I give you...

kale chips.

I'm sure you've probably heard of them before.
I had heard lots about them, and tried them multiple times but wasn't impressed!

Well, I think they just take practice to get them the way you want them!
We love them, and they make their appearance at our table frequently!!

here's whatcha do!

Grab a head of kale.
(oven to 350)

Tear it.
Put it on a cookie sheet
Drizzle with olive oil, add pepper and garlic salt.
Mix with your hands to get it all covered really well!

Put in the oven!!

Watch closely.  I find they go for about 4 minutes, then stir them around, then go not quite another 5.  Basically, when you touch them and they "crunch" they are good to go!

Sit out for a couple minutes, to let cool, and then Munch!

:)

Friday, September 6, 2013

Easiest side ever.


carrot fries!!!

They are SOOO yummy.  Taste a lot like sweet potato fries to me :) but healthier.

So i bought pre-cut carrots at meijer.  A bag would do, you'd just have to cut them to size :) I took the lazy way...

:)

Spread them out on a cookie sheet

add olive oil, garlic salt, and pepper.

Mix WELL with your hands.

put in a 400 degree oven for about 20 mins or so.


Boom.


Easy. Peasy. Tasty.

Sunday, August 11, 2013

21 days of NO gluten and NO refined sugar.


Well, some of you know, Mark & I are ending our 21 day detox.  We have felt AMAZING. So, as this 21 days closes out, we've decided...to start over!!  We have noticed the following things:

*more energy
*weight loss
*more alertness
*feeling way more healthy in general!


Many of you have expressed interest in trying this! and i say YES! do it! it feels so awesome!

So, i'm going to post a menu plan, and some needed recipes for the week.  Let me know if this is helpful, and feel free to comment any questions that you have, and i'll do my best to answer!
(if needing more specific help, let me know)

I'll post a few breakfast & Lunch Ideas, you can pick and choose, or do whatever you'd like.  It's not a strict "follow these rules" diet, just to keep the gluten & sugar out!


(sweetners that are UNrefined are allowed:
raw honey
100% raw agave nectar
100% raw maple syrup)


Breakfasts Ideas
-Eggs, fruit, breakfast meat
-GF oatmeal with berries, natural peanut butter, & greek yogurt
-Brown Rice bread with natural peanut butter & a banana


Lunch Ideas
-Salads with chicken, nuts, & loads of veggies
-Sandwich (brown rice bread), veggies& hummus, cheese


Dinner Plan:
(this is not a strict "diet plan" this is simply an idea for what to eat if your super lost and need some guidance !)

you can always add a salad, or more veggies, or some fruit, if desired!  

Monday:  Chili!  (crock-pot baby!) (ground turkey-LEAN. diced tomatoes, lots of beans.  make sure there is NO sugar added in beans and matos!)


Tuesday: Breakfast for dinner!  Waffles with fresh berries  (i like to top mine with berries, natural peanut butter and some 100% pure maple syrup)


Wednesday: Chicken with roasted zucchini, yellow squash, onion, and carrots.    (cut up all veggies, coat with olive oil and desired spices, roast in aluminum covered baking sheet in a 425 degree oven for approximately 20 minutes, or until veggies are soft. Stir once or twice during that time.)


Thursday:  Taco Soup.  (this is a crockpot meal, make a large amount and then you can eat off of it for lunch or dinner another night!)


Friday:  Pizza Night!!  Almond Crust Pizza, with salad or a veggie on the side!


Saturday:  Sweet Potato "chips", choice of meat, & Salad


Sunday:   Roasted Vegetables, Seasoned brown rice, some fresh fruit, & choice of meat!


here are recipe links that you'll need for this specific meal plan:

for the taco soup: http://www.imafanoffood.blogspot.com/2013/07/taco-soup.html

almond crust pizza: http://cavegirlinthekitchen.blogspot.com/2009/07/paleo-pizza.html

waffles:

Gluten-Free Dairy-Free Waffles

  • 3 cups rice milk
  • 1 cup brown rice flour
  • 2 cups gluten-free oats (you could also use millet or brown rice)
  • 4 Tablespoons coconut oil, melted
  • 4 teaspoons vanilla
  • 4 eggs
  • 4 teaspoons baking powder
  • 2 teaspoons salt
  • 1 teaspoon baking soda
In a Vita-Mix (or other powerful blender), combine rice milk, grains, coconut oil, eggs, and vanilla. Blend on high for two minutes until the grain is completely ground and blended.
Add baking powder, salt, and baking soda. Turn on blender again and mix until blended. Oil or butter the waffle iron and cook waffles for 2-4 minutes each, until done.
Makes around 10-12 waffles.


If you need help knowing how to make roasted veggies, or anything else, please comment or email me at lroseburkey@gmail.com. I'd be happy to help!

If you do this, let me know how your feeling! I'd love to hear about it!