Wednesday, July 31, 2013

Clean eating "reese cups"


Mark and I are on day 10 of a 21 day detox.  It is a refined sugar and gluten free detox.  It has had its ups and downs, but it is going well.  My body is responding quite well to it and i'm considering staying off gluten full time if i continue to feel better.

With that being said...this girl needs some chocolate in her life semi-often.
So i whipped these guys up:


Ingredients:
  • 1 Cup Coconut Oil
  • 1/2 Cup Natural Cocoa
  • 1/4 Cup + 2 Tbsp Pure Maple Syrup
  • 1/3 Cup Pumpkin Puree
  • 1/3 Cup Natural Peanut Butter
  • 1/3 Cup Pitted Dates
  • Dash of Salt
Directions:
  1. Spray a mini muffin tin with non-stick cooking spray.
  2. Using your small food proccessor bowl blend your coconut oil, cocoa and 1/4 cup of maple syrup until smooth (stopping to scrape down the sides occassionally).
  3. Using a large food processor bowl blend your pumpkin puree, peanut butter, dates, salt and 2 tbsp maple syrup until smooth. If you experience the batter being too thick add 1 tbsp of warm water and continue blending.
  4. Place 1/2 tbsp of your chocolate mixture in each muffin cup.
  5. Then layer just under 1 tbsp of your peanut butter mixture on top of the chocolate layer.
  6. Finally, place another 1/2 tbsp of the chocolate mixture on top of the peanut butter layer.
  7. Cover with saran wrap and place in the freezer for 2-3 hours.
  8. Remove and enjoy!
store in freezer.


if you make them, let me know how ya like them!  :) 

Friday, July 26, 2013

One of those dinners.

You all are familiar with the whole, "what in the world am i gonna make for dinner" question.  Those days when you end up having eggs for dinner or pancakes or some kind of weird canned vegetable that's been at the back of your pantry for a while.

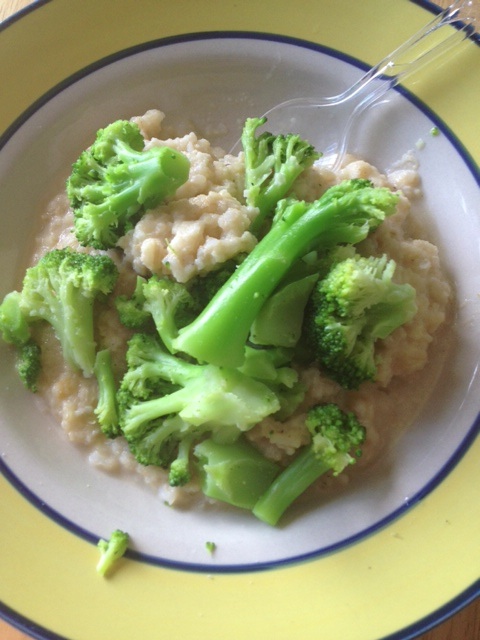
So, last night was one of those nights.  I had some broccoli, some rice, some fruit, and some cauliflower.

and so we had this...


That is brown rice, covered in a ooey, gooey, alfredo cheese garlic sauce.
WOW. it was so good.

and the best part..it's made from:

cauliflower.

I will be using this Alfredo sauce recipe from now on!!  What an awesome way to SNEAK in veggies. And it would be good over anything!
The best part for me???


MY KIDS DEVOURED IT!


So, here's the recipe:

(makes about 5 cups)

INGREDIENTS
  • 8 large cloves garlic, minced
  • 2 tablespoons butter
  • 5-6 cups cauliflower florets
  • 6-7 cups vegetable broth or water
  • 1 teaspoon salt (more to taste)
  • ½ teaspoon pepper (more to taste)
  • ½ cup milk (more to taste)
  • colby jack or mozzarella cheese (optional)


INSTRUCTIONS
  1. Garlic: Saute the minced garlic with the butter in a large nonstick skillet over low heat. Cook for several minutes or until the garlic is soft and fragrant but not browned (browned or burnt garlic will taste bitter). Remove from heat and set aside.
  2. Cauliflower: Bring the water or vegetable broth to a boil in a large pot. Add the cauliflower and cook, covered, for 7-10 minutes or until cauliflower is fork tender. Do not drain.
  3. Puree: Use a slotted spoon to transfer the cauliflower pieces to the blender. Add 1 cup vegetable broth or cooking liquid, sauteed garlic/butter, salt, pepper, and milk. Blend or puree for several minutes until the sauce is very smooth, adding more broth or milk depending on how thick you want the sauce.  Add cheese to your taste, and gradually stir in until melted and well incorporated. You may have to do this in batches depending on the size of your blender. Serve hot! If the sauce starts to look dry, add a few drops of water, milk, or olive oil.


Let me know if you love  it as much as WE did!


Monday, July 22, 2013

Crustless, Gluten-free, refined sugar free, grain free HONEY LEMON CHEESECAKE.

one word.

yum.


It's actually easier then one would think to find a "dessert" that isn't full of crap not good for you stuff.

It generally takes more time because there are a lot of nuts and dates and things of that sort.

BUT, not this beauty.

Quick & Easy!!!!


it's super light!  PERFect summer dessert.


Here's what you need to buy:

  • 1 1/2 cups plain 2% greek yogurt (I don't recommend using fat free)
  • 1 cup non fat cream cheese
  • 1 tsp vanilla
  • 1/4 cup + 1 tbsp honey
  • 3 egg whites
  • 1/4 cup arrowroot starch or cornstarch
  • 1 tbsp lemon zest
  • 1/2 of a lemon's juice (plus more to taste) 

Preheat oven to 350F.  Combine all ingredients in a large bowl.  Mix until all ingredients are incorporated.  If it looks a little thin, that is OK!  Pour mixture into a greased 8x8 circle pan (a springform is best).  Bake in preheated oven for 40 minutes.  Remove from oven.  Chill in fridge overnight, or for at least 8 hours.  After chilled, cut into slices and serve chilled.  Store leftovers in the fridge.


i actually only chilled mine about 6 hours...but it was just fine.
I also put lemon zest all over the top! :) 


disclaimer:  Obviously this will not taste like a cheesecake laden in sugar and butter and fat.  Don't expect that or you will be disappointed!  Changing your "dessert" palate over to a more real-food way of living is so good for you and if you get used to that, you'll probably really enjoy this little cake :) 


Sunday, July 21, 2013

Small changes for a more "real" diet.

Some things to a "real food" diet can be quite overwhelming. I'm the first to admit it takes MUCH MORE TIME.   But there are somethings that you can switch over, that are really quite easy!
Here's a GREAT example.

Dried onion soup mix.  Yummy on meats, for burgers, in a roast, etc.  let's take a look at what we've got in a dried onion soup mix at the store:


first off, holy ingredient list. 
second off, "autolyzed yeast extract" = MSG.
oh..and what the crap is "anti caking agent" ew.

just a few of the nasties this thing contains.


Sooo...why not just make our own??

Here's a recipe:

2/3 cup dried minced onion
1 Tbsp parsley flakes
2 tsps onion powder
2 tsps turmeric
1 tsp celery salt
1 tsp sea salt
1 tsp favorite sugar/natural sweetener (can omit) 
1/2 tsp ground black pepper

Mix all together and whoa-la Onion Soup Mix!


yes, you have to mix spices together.  Yes, you have to maybe buy some spices.  But make it in bulk! Then your set!

Baby steps to help us all step away from the nasty junk we put in our bodies FAR too often!

Tuesday, July 9, 2013

Taco Soup.

Let's talk about an EASY meal.  This would be that meal.


(get your crock-pots ready!)
Taco Soup.  Really it seemed to be a version of white chicken chili.  But man, it was GOOD.  and it's good for the waist-line too :)   You could take out the cheese and brown rice chips that I topped mine with to make it even less calories :)

So throw the following things in your crock-pot
*1 lb chicken breast
*1 cup chicken broth (i didn't have enough so i threw so beef broth in too.  Just use whatcha got!) 
*1 can of black beans (drain and rinse)
*1 can of white beans (drain and rinse)
*1 can of diced tomatoes (don't drain- use that juice!)
* 3/4 plain greek yogurt
*1 4oz can diced chilies (I stuck with mild so my kids would eat it- but get hotter if you want it hotter!)
*2 T fresh squeezed lime
*1 clove garlic
*1 T oregano
*1/2 t onion powder
*1/2 tsp paprika
*1 tsp cumin
*1 tsp dried cilantro (could use fresh too! just used about 2 T if using fresh)


Then...here comes the hard part

turn your slow-cooker on.
:)

cook for 4 hours on high
and about 6 hours on low

Then shred up your chicken and stir well and serve hot!! Add cilantro on top and cheese if you wish 

:)


and ENJOY!

Thursday, June 20, 2013

Bread Crumbs!! (with no bread)

I'm not gonna lie, i'm pretty excited about these beauties:


Breadcrumbs!

People use breadcrumbs in so many things.  They can turn a "healthy" dish into a not so "healthy" dish pretty quickly if your not careful!
The beauty of these breadcrumbs is that there is NO bread.
They are also pretty versatile.  You can cater them to YOUR tastes.

How do you make these?
1.) Nut crumbs
(simply pick a nut...put it in a food processor until it looks like breadcrumbs! I used walnuts here.  Pecans, macadamia nuts, etc would work too!
2.) Parmesan cheese
3.) coconut flour
4.) spices of your choosing! (i like to use italian) 

combine 1 cup of the nut crumbs, 2 tablespoons of the coconut flour, 1 cup of the cheese, and as many spices as you'd like!
That's IT!

I made this broccoli cheese fritters with the breadcrumbs this week:

(not a great picture, but they were DELICIOUS)

You can sub them in anything you'd normally put breadcrumbs in!! Just use your judgement..if it looks like it needs more, add more! :)

I used them in my turkey loaf this week as well as these fritters and i must say-
i'm never going back to prepackaged bread crumbs!!


Monday, June 17, 2013

Grain Free Bread

I was really excited about this one!!  Mark and I are eating no grains (trying to) for a month.  Yes, we occasionally have some slip-ups :)  BUT- mark is a huge fan of sandwiches, so i wanted to find a grain free recipe!   I gave it a go and it turned out pretty good!


It tasted really "light" and it was good!  We even made BLT's with it :)


The downside is that it is kind of an expensive loaf of bread!!

I'll definitely be making it again, but it will be a "on occasion" thing because of the price!

Heres the recipe:

INGREDIENTS

  • 1.5 cups RAW Almond Butter (More AB makes a taller loaf)
  • 2 teaspoons Apple cider vinegar
  • 5 Eggs
  • 1 teaspoon Baking Soda
  • 1/2 teaspoon Salt
  • 3 tablespoons Olive oil
  • 2 tablespoons water (optional as needed)


and here's whatcha do!

Variables:
1. When baking without yeast, gluten and baking powder, vinegar and baking soda are added to help things rise. In my grain free adventures I learned that the right pan is absolutely necessary. Why? Two reasons. A. A wide pan will not give you a very tall loaf and you will have a flat bread, not always great for sandwiches. The pan I used was about 7x3.5. Average pans available in stores are not this size. If you don't want to buy this specific pan, I suggest adding to the recipe to give you a proper "loaf". Your batter should be 3/4 the way to the top of your pan to make a nice sized loaf.
2. Because of the vinegar you cannot use a non-stick pan. The vinegar reacts to the chemicals and turns your lovely loaf of bread GREEN! If you don't use the pan I used, line your pan with parchment.
3. Almond Butter brands all vary in consistency and this will affect your results. Some are thicker, some are blanched, etc. I made 3 different loaves. One with Almondie (preferred), one with Raw Natural Almond Butter and one with homemade Almond Butter.
I hope this helps!

DIRECTIONS

1.Please read the notes before starting this recipe.
2.Add all eggs to a mixing bowl and scramble until frothy, add in the vinegar and mix.
3.Add the almond butter and mix well, depending on the brand you use, you may need a hand mixer.
4.Add oil batter should be a free flowing liquid, pourable and not too thick. One brand I used I needed to add 2 tbsp water, brands will differ your result. Use the water only if you feel the batter is too thick. It should be like pancake batter is the best way I can explain it.
5.Add in salt and baking soda and mix really well.
6.(Read notes on pans) Immediately bake at 300 degrees for about an hour. Don't let it get too brown. Test with a toothpick.
7.Let cool on counter. Wrap in paper towels, place in a ziploc and keep in fridge for 7 days. Slice as needed.